There are a lot of authentication methods for web applications and one of them is passport js. It allows you to use Google to authenticate your Node.js applications. Google authentication may be simply and unobtrusively implemented into any application.
Passportjs is a popular choice for frameworks supporting Connect-style middleware. Hence, it is widely used with Express. So without further delay, let us start learning about authentication with node js and passportjs.
What is Passport?
Passport is a Node.js authentication middleware. Passport is a highly versatile and modular web application framework supporting seamless integration into any Express-based web application. Furthermore, it supports authentication with a username and password, as well as Facebook, Twitter, and other social media platforms, by a diverse collection of mechanisms.
What are strategies in Passport?
Authenticating requests are the responsibility of strategies, which they accomplish by implementing an authentication mechanism. There are authentication techniques that specify how to encode a credential in a request, such as a password or a claim from an identity provider (IdP). There are 500+ strategies in Passport. You can also read about other strategies at https://www.passportjs.org/packages/
Initial Setup
- Create an empty directory with any name you want.
- Open the folder with any code editor. I would like to prefer VS Code.
- Now press ctrl + shift + ~ to open terminal.
- Now type npm init -y and hit enter. It will create package.json file and install necessary node modules
- Now type npm install express nodemon passport cors dotenv cookie-session passport-google-oauth20
Registering application
You must first register an application with Google before using passport-google-oauth20. A new project can be created via the Google Developer Console if you haven’t previously. A client ID and client secret will be assigned to your application, which must be submitted to the strategy. Also, You’ll need to set up a redirect URI that corresponds to the route in your app. Read more about how to register an app to google console.
Configuring Strategy
Users are authenticated using a Google account and OAuth 2.0 tokens in the Google authentication technique. When constructing a strategy, the client ID and secret obtained when building an application are provided as choices.
A verify callback, which receives the access token and optional refresh token, as well as profile, which includes the authorized user’s Google profile, are also required by the strategy. For authentication completion, the verified callback must contact cb supplying a user.
In your src directory, create file server.js and put the below code in it.
const express = require("express");
const dotEnv = require("dotenv");
const cors = require("cors");
const app = express();
const passport = require("passport");
const cookieSession = require("cookie-session");

dotEnv.config(); //for reading data from env file
app.use(express.json()); //for fetching data from request body
app.use(cors()); //for cross origin requests

const port = process.env.PORT || 5000;

app.get("/", (req, res) => {
  console.log(res.send("api is running..."));
});
app.listen(port, () => {
  console.log(`port is running on ${port}`);
});
Now create .env file in the root directory and paste the following content into it
PORT = 5000
GOOGLE_CLIENT_ID = your client id here
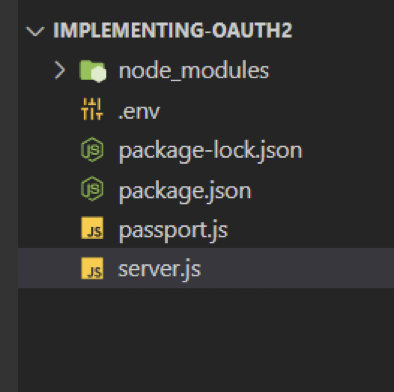
GOOGLE_CLIENT_SECRET = your client secret id here Directory Structure:
Similarly, create another file passport.js, and put the following code.
Passport.js
/**
 * Configuring Strategy
 */
const passport = require("passport");
const GoogleStrategy = require("passport-google-oauth20").Strategy;

passport.serializeUser(function (user, done) {
  done(null, user);
});

passport.deserializeUser(function (user, done) {
  done(null, user);
});

passport.use(
  new GoogleStrategy(
    {
      clientID: process.env.GOOGLE_CLIENT_ID,
      clientSecret: process.env.GOOGLE_CLIENT_SECRET,
      callbackURL: "http://localhost:5000/auth/callback",
      passReqToCallback: true,
    },
    function (request, accessToken, refreshToken, profile, done) {
      //console.log(profile);
      return done(null, profile);
    }
  )
);
Authenticating Requests
app.get("/failed", (req, res) => {
  res.send("Not Authorized");
});

//on Success, URL
app.get("/success", (req, res) => {
  res.send(`Welcome ${req.user._json.email}`);
});

//requesting google route
app.get(
  "/auth/google",
  passport.authenticate("google", { scope: ["email", "profile"] })
);
//will act as a callback URL which will be called if Google Authentication is Successful.
app.get(
  "/auth/callback",
  passport.authenticate("google", {
    failureRedirect: "/failed",
  }),
  function (req, res) {
    res.redirect("/success");
  }
)
Now create file server.js, if you haven’t, and put the below code in it.
Finalizing
const express = require("express");
const dotEnv = require("dotenv");
const cors = require("cors");
const app = express();
const passport = require("passport");
const cookieSession = require("cookie-session");
dotEnv.config(); //for reading data from env file
app.use(express.json()); //for fetching data from request body
app.use(cors()); //for cross origin requests
const port = process.env.PORT || 5000;
//configuring passport strategy
require("./passport");
//registering middlewares
app.use(
cookieSession({
name: "google-auth-session",
keys: ["key1", "key2"],
})
);
app.use(passport.initialize());
app.use(passport.session());
//registering routes
//on Auth Failed, URL
app.get("/failed", (req, res) => {
res.send("Not Authorized");
});
//on Success, URL
app.get("/success", (req, res) => {
res.send(`Welcome ${req.user._json.email}`);
});
//requesting google route
app.get(
"/auth/google",
passport.authenticate("google", { scope: ["email", "profile"] })
);
//will act as a callback URL which will be called if Google Authentication is Successful.
app.get(
"/auth/callback",
passport.authenticate("google", {
failureRedirect: "/failed",
}),
function (req, res) {
res.redirect("/success");
}
);
//setting up server
app.listen(port, () => {
console.log(`server is up on ${port}`);
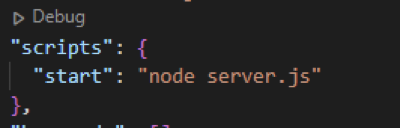
});And inside package.json file add
Result
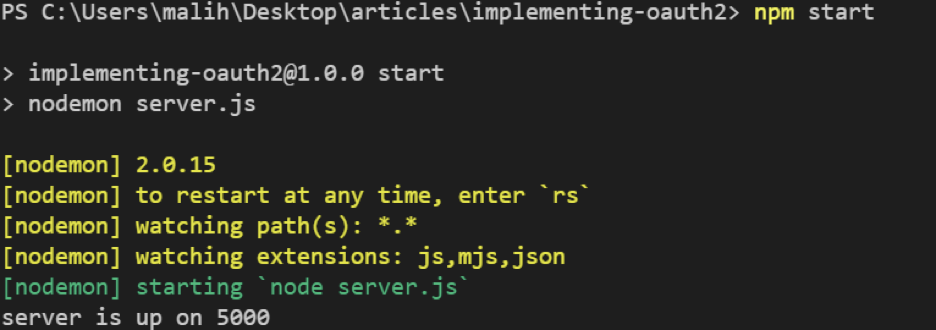
Let us run the script by npm start
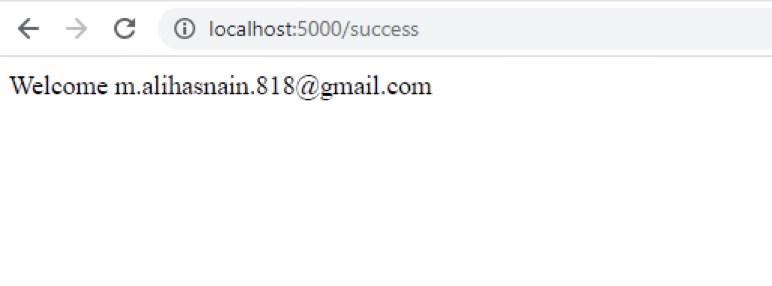
Conclusion
In the end, we have successfully been authenticated by Google. Hence, this is how you can set up authentication with node js and passportjs. You can check other node js tutorials here.